OpenBlue Employee Training Hub
Welcome to your go-to resource for mastering the UW's Hybrid Workspace Scheduling Tools! This site is designed to help you confidently navigate and use:
- Resource Scheduler
- MapView
- FMS: Now! (mobile app)
- Find-A-Room (Outlook plugin)
Whether you're reserving a desk, finding a meeting room, or managing hybrid schedules, this guide will walk you through the essential features and workflows of each tool, allowing you to choose the best one for your needs.
What You’ll Learn
- How to use each booking tool effectively
- How to download and install the Outlook plugin and mobile app
- How to navigate interactive floorplans and locate resources
- How to make, check into and cancel reservations
Tool Capability Matrix
| Resource Scheduler | Map View | FMS: Now! | Find-A-Room | |
|---|---|---|---|---|
| Interactive Floorplans | ❌ | ✅ | ✅ | ✅ |
| Search for Resources | ✅ | ✅ | ✅ | ✅ |
| Make, Check into and Cancel Reservations | ✅ | ✅ | ✅ | ❌ |
| Make a Recurring Reservation | ✅ | ✅ | ❌ | ✅ |
| Compatible with Mobile Devices | ❌ | ❌ | ✅ | ❌ |
| No Download Required | ✅ | ✅ | ❌ | ❌ |
| Resource Images | ✅ | ❌ | ✅ | ✅ |
Training Materials
Each section below includes short videos and step-by-step instructions to help you get started quickly with each tool. Whether you're a first-time user or need a refresher, these resources are designed to be clear, concise, and actionable.
If you run into issues please check out the FAQ (accessible from the navigation menu).
User Guide (PDF)
Beginner's Guide
For detailed, step-by-step instructions with helpful screenshots, refer to the Beginner’s Guide:
GO TO THE GUIDEResource Scheduler
Resource Scheduler - Book from the Navigation Tree
- Log in to Resource Scheduler.
- Locate the "UW Tree" on the left and expand the desired building and resource group.
- Select the resource you want to book.
- Review the availability calendar and check for an asterisk (*) indicating a permanently assigned resource which cannot be booked.
- Click the resource name to view details or photos.
- Click an available start time on the desired date.
- Enter a reservation title (your name for desks; a clear meeting title for conference rooms) and input the number of attendees.
- Set the end time, select Submit and confirm the booking.
Resource Scheduler - Book through the Reservation Wizard
- Log in to Resource Scheduler and open the Reservation Wizard.
- Under Scope, select one or more buildings.
- Choose the appropriate Group (floor or resource type) and Resource Type if needed.
- Enter the number of attendees and apply any relevant filters.
- Select the reservation date, start time, end time and leave Recurring set to None.
- Choose Only Available Resources, review options and select a resource.
- Update the reservation title if needed, click Submit and confirm the booking.
Resource Scheduler - Recurring Booking
- Log in to Resource Scheduler and open the Reservation Wizard.
- Under Scope, select one or more buildings.
- Choose the appropriate Group (floor or resource type) and Resource Type if needed.
- Enter the number of attendees and apply any relevant filters.
- Select the first date, start time and end time for the booking.
- Under Recurring, choose the pattern (Daily, Weekly or Monthly) and select the applicable options, then click Next.
- Review resource details and select an appropriate resource.
- Update the reservation title if needed, click Submit, resolve any warnings and confirm the reservation.
Resource Scheduler - Edit a Booking
- Log in to Resource Scheduler.
- Go to the My Reservations section and select the reservation you want to edit.
- In the pop‑up window, locate the editable fields (those not grayed out).
- Update the necessary information, such as the date, time or reservation name.
- Be aware that changing the date or time may cause the resource to be unavailable.
- Click Save.
- If editing a recurring reservation, choose whether to save only this event or this and future events.
- Reopen the reservation to confirm your changes were applied.
Resource Scheduler - Delete a Booking
- Log in to Resource Scheduler.
- Go to the My Reservations section and select the reservation you want to delete.
- In the pop‑up window, click the More button.
- Select Delete or Delete Event to remove a single occurrence.
- To delete an entire recurring series, select Delete This and Future Events.
- When prompted, confirm the deletion by clicking OK.
- Verify that the reservation has been removed.
Resource Scheduler - Check In
- Confirm with your Space Administrator whether check‑in is required for your resource.
- Note that check‑in is available on the day of your reservation and must be completed within the first hour of your reservation.
- Log in to Resource Scheduler.
- Go to the My Reservations section and locate your reservation.
- Select the reservation name.
- In the pop‑up window, click the box next to Check In.
- Click Save to complete the check‑in.
- Reopen the reservation to confirm the check‑in time is displayed and the option is disabled.
Email - Check In
- Open the reservation confirmation message sent to your email.
- Click the blue check in link.
- On the webpage the reservation will be listed under the 'My Reservations' section.
- Open the reservation details by clicking your name.
- Check the box next to 'Check In' and click Save at the top.
- If you want to double check that you are checked in, click the link again.
- You will see your check in time next to the greyed out check box.
- Key Reminders
- You can check in starting at midnight on the day of your reservation. You must check in within the first hour of the reservation start time.
- If you do not check in, your reservation will be released.
- Each reservation can last up to 10 hours.
Resource Scheduler - Check Out
- Confirm with your Space Administrator whether check‑out is required for your resource.
- Note that check‑out is only available after you have checked in and you will be checked out automatically at the end of your booking.
- Log in to Resource Scheduler.
- Go to the My Reservations section and locate your reservation.
- Select the reservation name.
- In the pop‑up window, click the box next to Check Out.
- Click Save to complete the check‑out.
- Reopen the reservation to confirm the check‑out time is displayed and the option is disabled.
Map View
Map View - Book a Resource
- Open Map View and sign in.
- On the bottom toolbar, click 'Locations'.
- You will see a list of buildings and floors. Select the location where you want to book.
- You may be prompted to Set Default Map - it is recommended to set your default to the location you work most often.
- Set the time and date for the reservation.
- Look at the map to identify available spaces
- A green plus means the space is available.
- A blue dot or flag means the space is already scheduled.
- Select the space you want to book.
- Detailed information about the space will be shown on the right. Click the green 'Book' button.
- You may change the booking title or keep it as the default. Click the green 'Book' button again.
Map View - Recurring Bookings
- Open Map View and sign in.
- Just above the toolbar, click on the date. A calendar view of the selected month will appear.
- Hold down the CTRL key and click the dates you want included. Selected dates turn blue.
- Click on the time and set the duration for your recurring meetings.
- Expand the toolbar with the small ^ button on the right side.
- Scroll through the list of available desks shown in green. When one is selected, its location will be highlighted on the floor plan.
- You may also select a room directly on the floor plan.
- A green plus means the space is available.
- A blue dot or flag means the space is already scheduled.
- Detailed information about the space will be shown on the right. Click the green 'Book' button.
- You may change the booking title or keep it as the default. Click the green 'Book' button again.
Map View - Check In
- Open Map View and sign in.
- Select 'Bookings' from the toolbar at the bottom.
- Expand the toolbar with the small ^ button on the right side.
- Select the booking you want to check in for.
- Click the green 'Check In' button.
- Key Reminders
- You can check in starting at midnight on the day of your reservation. You must check in within the first hour of the reservation start time.
- If you do not check in, your reservation will be released.
- Each reservation can last up to 10 hours.
Email - Check In
- Open the reservation confirmation message sent to your email.
- Click the blue check in link.
- On the webpage the reservation will be listed under the 'My Reservations' section.
- Open the reservation details by clicking your name.
- Check the box next to 'Check In' and click Save at the top.
- If you want to double check that you are checked in, click the link again.
- You will see your check in time next to the greyed out check box.
- Key Reminders
- You can check in starting at midnight on the day of your reservation. You must check in within the first hour of the reservation start time.
- If you do not check in, your reservation will be released.
- Each reservation can last up to 10 hours.
FMS: Now (Mobile App)
FMS: Now (Mobile App) - Install
- Open the App Store (iOS) or Google Play Store (Android).
- Search for “FMS:Now”.
- Tap “Get” (iOS) or “Install” (Android) to download the app.
- Once installed, open the app.
- Enter the Account API URL:
- https://uw.resourcescheduler.net/rsmcp
- A green check will appear when you’ve entered the URL accurately.
- Click the "Login" button and log in using your UW NetID credentials.
- If prompted, you do not need to allow "full access" to your calendar.
- This refers to your personal calendar.
- You can begin to use the mobile application.


FMS: Now (Mobile App) - Book a Resource
- Launch FMS:Now! on your mobile device.
- Scroll down to the section labeled Floor Plan.
- Tap the map to explore available floor plans and choose the appropriate floor.
- Set Your Reservation Time
- Choose the date you plan to be in the office.
- Set your start and end times for the reservation.
- Look for a desk or room marked with a green plus icon (this indicates availability).
- Book the Resource
- Tap the resource to view its details.
- Confirm the reservation information.
- Tap Book to finalize your reservation.
FMS: Now (Mobile App) - Check In
- Launch FMS:Now! on your mobile device.
- Find your reservation under 'My Reservations'.
- Click the blue 'Check In' button.
- This will lead to another page with 'Please Check In' at the top. Click the blue 'Check In' button again.
- Your Check In is confirmed with a green banner along the top of the page and the text 'You have checked in'.
- Key Reminders
- You can check in starting at midnight on the day of your reservation. You must check in within the first hour of the reservation start time.
- If you do not check in, your reservation will be released.
- Each reservation can last up to 10 hours.
Find-A-Room (Outlook Plugin)
Outlook Plugin - Install
- Download the manifest file.
- Open the Add-Ins section of Outlook for web (https://aka.ms/olksideload).
- Note: the add-in popup may take a minute to load.
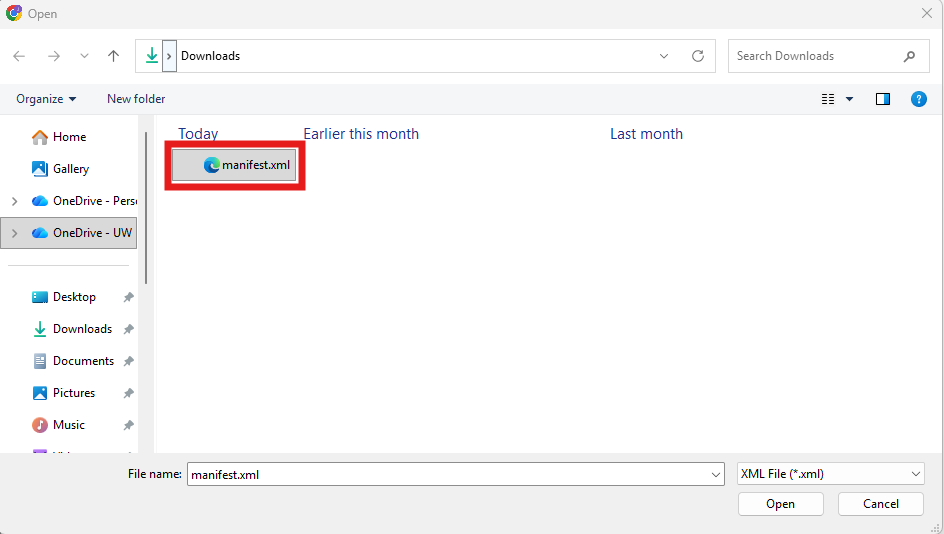
- In the popup select My add-ins from the side menu and scroll down until the “Add a custom add-in” dropdown is visible. Open the dropdown and select “Add from File…”
- In the file explorer popup window find and open the manifest file you downloaded in Step 1.
- Back in add a custom add-in popup select Install.
- Once loaded, the Find a Room plugin will appear in the “New Appointment” window in Outlook for desktop and web. It is not available on Outlook mobile.
- Note: It can take up to an hour for the add-in to appear in Outlook.


Outlook Plugin - Book from a Floorplan
- Open your Outlook Calendar.
- Click 'New Event'.
- On the toolbar, click the 'Find A Room' plugin.
- Set the date and time on the Outlook Event.
- Choose your location.
- For the first option, select 'UW Seattle'
- For the second option, navigate to the building, floor, and room type you need. 'Workspaces' refers to desks.
- Set the capacity (it is required even for individual desks).
- Click the blue 'View [Building Name] [Floor Number]' button.
- A popup window will appear with the floor plan you selected. The symbols on top of each reservable space display availability.
- You can adjust the reservation time in the upper right hand corner.
- A green plus means the desk is available.
- A blue flag means a desk is already scheduled.
- Click on a desk with a green plus to view details
- Confirm the number of attendees.
- Click Reserve.
- Add a title to the Outlook Event and save it.
- Mark your availability as free so your desk time won't show as busy on your calendar.
Outlook Plugin - Book using Search
- Open your Outlook Calendar.
- Click 'New Event'.
- On the toolbar, click the 'Find A Room' plugin.
- Set the date and time on the Outlook Event.
- Choose your location.
- For the first option, select 'UW Seattle'
- For the second option, navigate to the building, floor, and room type you need. 'Workspaces' refers to desks.
- Set the capacity (it is required even for individual desks).
- Click the blue 'Search' button.
- A list of available spaces will appear. Use the 'i' information button to see detailed info for each space.
- Close the 'i' information pop up and click on the title of the space you want to reserve.
- Set the number of attendees.
- Click Reserve.
- Add a title to the Outlook Event and save it.
- Mark your availability as free so your desk time won't show as busy on your calendar.
Outlook Plugin - Book using Advanced Search
- Open your Outlook Calendar.
- Click 'New Event'.
- On the toolbar, click the 'Find A Room' plugin.
- Set the date and time on the Outlook Event.
- Click the 'Advanced Scheduling' button.
- Choose your location.
- For the first option, select 'UW Seattle'
- For the second option, navigate to the building, floor, and room type you need. 'Workspaces' refers to desks.
- Set the capacity (it is required even for individual desks).
- Click the blue 'Search' button.
- A list of available spaces will appear. Use the 'i' information button to see detailed info for each space.
- Click the check box for the space you want to reserve, then 'Reserve (1)' near the top of the screen.
- Set the number of attendees and click 'Reserve'
- Add a title to the Outlook Event and save it.
- Mark your availability as free so your desk time won't show as busy on your calendar.
Email - Check In
- Open the reservation confirmation message sent to your email.
- Click the blue check in link.
- On the webpage the reservation will be listed under the 'My Reservations' section.
- Open the reservation details by clicking your name.
- Check the box next to 'Check In' and click Save at the top.
- If you want to double check that you are checked in, click the link again.
- You will see your check in time next to the greyed out check box.
- Key Reminders
- You can check in starting at midnight on the day of your reservation. You must check in within the first hour of the reservation start time.
- If you do not check in, your reservation will be released.
- Each reservation can last up to 10 hours.
Outlook Plugin - Check In from Calendar
- Open your Outlook Calendar.
- Click on your space reservation event.
- Find the blue 'FMS:Employee' link in the event description.
- Hold down the CTRL key on your keyboard and click the link.
- Under 'My Reservations' find the reservation you need to check in for and open it by clicking your name.
- Check the box labeled 'Check In' and click Save in the upper right.
- If you want to double check that you are checked in, click the link again.
- You will see your check in time next to the greyed out check box.
- Key Reminders
- You can check in starting at mightnight on the day of your reservation. You must check in within the first hour of the reservation start time.
- If you do not check in, your reservation will be released.
- Each reservation can last up to 10 hours.