FM:Systems (Space Manager) Training
This site is your central hub for learning how to confidently navigate FM:Systems (Space Manager), the university’s space management platform. Explore step-by-step guides, video tutorials, and best practices for viewing floorplans, managing space data, generating reports, and more. Whether you’re new to FM:Systems or looking to sharpen your skills, these resources will help you make the most of the university’s space management tools.
The following modules are included on this page:
- Getting Started
- Navigating FM:Systems
- Floorplan Interaction
- Running & Exporting Reports
- Editing Space Information
- Research Space Tracking
This page is not a substitute for the required training in Bridge. Please complete your assigned courses first, you can find them here:
Go to BridgeModule 1 - Getting Started
Log into FM:Systems
Log into FM:Systems - Quick Steps
- Open Your Browser: and navigate to Space Manager (https://uw.fmshosted.com/FMInteract/Default.aspx).
- Enter Your UW Email:On the login page, enter your full UW email address (including @uw.edu) and click Next.
- Authenticate:
- Enter your UW NetID password and click Sign in.
- Complete Duo authentication if prompted.
- After successful login, you will see the FM Systems home screen.
*Pro Tip: You can also navigate directly to FM:Systems through the Space Manager service page.
Navigating the Site and the Global Search
Navigating the Site and the Global Search - Quick Steps
Site Navigation
Click the Space Management icon from the left navigation bar to explore the available menus:
- Sites: A list of University campuses and properties. Use the Sites menu to interact with building floor plans.
- Views: This section provides tabular data displays, allowing you to quickly interact with space data without needing to navigate through floor plans.
- Reports: Pre-configured reports to analyze space data.
- Documents: A discontinued module which will be removed in a future release.
- Favorites: You can favorite floor plans, data views, or reports for quick access (more on this in module 2).
Using the Global Search
- Locate the search box at the top of the page.
- Type a keyword (e.g., “1327” for Savery Hall) and click the magnifying glass or press the Enter key.
- View matching room and floor records under Space Inventory and Floors/Drawings.
Role-Based Access
FM:Systems assigns access and editing privileges based on your user role. Here’s a breakdown of each role:
- Space Administrator: Full access to all modules. Can view and edit room records across all buildings and departments.
- Departmental Administrator: Can access the Space Management module and edit rooms tied to their department’s cost center hierarchy. Has view-only access to all other data.
- Space Data User: Can access the Space Management module with view-only permissions for all space records.
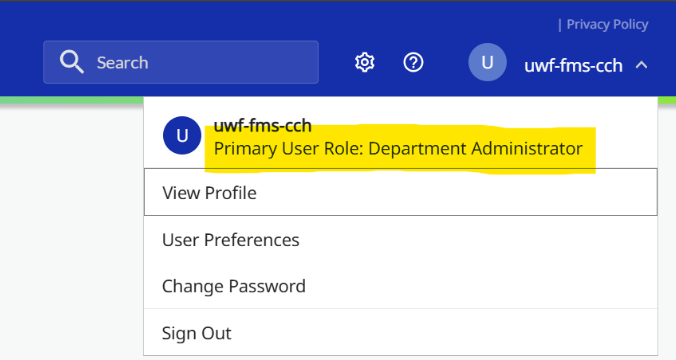
Need to confirm your role? Simply click on your NetID in the upper right of FM:Systems to view your assignment.
Module 2 - Navigating FM:Systems
View Space Records by Site
View Space Records by Site — Quick Steps
- Access the Dashboard: Click the Space Management icon from the left-hand navigation pane.
- Select a Site: In the Sites section, choose a location (e.g., UW Seattle).
- Choose a Building and Floor:
- Select a building (e.g., 1327 Savery Hall).
- Then select a floor (e.g., Floor 03).
- The floorplan will load automatically.
- Expand Floor Information: Click the expand/collapse button above Area Information to view complete floor details.
- View Room Details:
- Collapse the floor record to view the map.
- Click on a room from the floorplan (e.g., Room 348).
- Expand Room Information: Click the expand button above
Occupants to view:
- Assigned Department
- Occupants
- Room Area and Use
Pro Tip: Module 3: Floorplan Interaction includes a hands-on walkthrough of navigating these graphic layouts.
View Space Records Through Data Views
View Space Records Through Data Views — Quick Steps
- Access the Dashboard: Click the Space Management icon from the left-hand navigation pane.
- Access Building Records:
- Go to the Views section.
- Select Buildings from the list.
- Click a building name to open its record.
- Use the Collapse/Expand button to view full building details like site code, facility number, and gross area.
- View Floor Details:
- In the building record, click the Floors tab.
- Select a floor to load its details (e.g., floor name and gross area).
- Explore Room Records:
- Click the Rooms tab within the floor record.
- Select a room to view attributes like Room Number, Name, Area, and Primary Use.
- Click the View button to load the floorplan*.
*Pro Tip: Module 3: Floorplan Interaction includes a hands-on walkthrough of navigating these graphic layouts.
Filter, Search and Sort
Filter, Search and Sort — Quick Steps
- Open Rooms Data View:
- Click the Space Management icon from the left-hand navigation pane.
- In Views, select 1.40r Rooms - Read Only.
- Apply Filters:
- Click the Show Filters icon in the upper right corner.
- Enter a keyword (e.g., “Music”) under Assignment Key.
- Click the Filter icon and choose Contains.
- Sort the Data:
- Click any column header (e.g., Building Description or Facility Number) to sort in ascending or descending order.
- Use sorting to organize data for review.
- Use Search:
- In the Rooms view, locate the Search Bar in the upper right corner.
- Enter keywords (e.g., “BHS”) and click Search.
Managing Favorites
Managing Favorites — Quick Steps
Adding Favorite Floorplans
- Click the Space Management icon from the left-hand navigation pane.
- Select the Sites menu.
- Navigate to a location (e.g., Northwest Hospital Campus).
- Click the + to expand the site (e.g., 6446 UWMC NW/A).
- Expand the floor list and hover over the floor number, then click Add to Favorites (the Star Icon).
Adding Favorite Data Views and Reports
- Open the Views or Reports menu.
- Hover over the data view or report you wish to favorite and click Add to Favorites (the Star Icon).
Access Your Favorites
- From the left-hand navigation, click Favorites (the Star Icon).
- Select your saved location, data view, or report to instantly reopen the record.
Pro Tip: Use favorites for frequently accessed spaces, reports, or data views to save time and reduce clicks.
Module 3 - Floorplan Interaction
Access, view and navigate floorplans
Access, view and navigate floorplans — Quick Steps
Access a Floorplan in FM Systems
- Click the Space Management icon from the left navigation pane.
- From the Sites menu, choose a location (e.g., UW Seattle).
- Select a building from the list (e.g., 1026 Plant Ops Anx 6).
- Choose the floor you want to view (e.g., Floor 01).
- The floorplan will automatically load on your screen.
Navigation Dropdown
- Use this tool to move between sites, buildings, and floors without leaving the map.
- Click the dropdown arrow to select a new location.
- Tap the three dots under Buildings to open the search panel and find a specific building by name or facility number.
Graphic Views
- These views provide visual overlays of space data.
- The default is the Base Floor Plan.
- Use the dropdown to switch to views like Departments, which display color-coded assignments.
- Refer to the Legend (bottom-left corner) to understand what each color represents.
Zoom Tools
- Zoom Rectangle: Draw a box to zoom into a specific area.
- Fit to Window: Adjusts the view to show the entire floorplan.
- + / – Magnifying Glass: Zoom in or out incrementally.
- Full Screen: Expands the floorplan to fill your entire display.
Actions Menu
- Change Units: Toggle between square feet and square meters.
- Export to PDF: Save a static copy of the floorplan for reports, presentations, or sharing (more on this in section 2 of this module).
Export floorplans to PDF
Export floorplans to PDF — Quick Steps
- Open the Floorplan: Make sure the floorplan you want to print is already open.
- Access the Actions Menu: In the upper-right corner of the viewer, click the Actions menu and select Export to PDF.
- Configure Export Settings:
- Enter a name for your file.
- Confirm the floor you want to include.
- (Optional) Click Select Floors to add more locations, buildings, or floors.
- (Optional) Use Separate Files By to split PDFs by site, building, or floor.
- (Optional) Adjust page size, margins, and font size — defaults are applied if skipped.
- Export and Print:
- Click Export to generate the PDF.
- Once downloaded, open the PDF and print using your standard PDF viewer.
Pro Tip: Avoid using the direct "Print" option in FM Systems — exporting to PDF generates a higher quality layout.
Module 4 - Running & Exporting Reports
Running Standard Reports
Running Standard Reports — Quick Steps
- Open Reports Menu:
- Click the Space Management icon from the left-hand navigation pane.
- Select Reports from the dashboard.
- Choose a Report: Browse available reports like Building Primary Use Allocation or Facility Information. Identify the report that fits your reporting needs.
- Run the Report: Click the name of the report (e.g., Building Primary Use Allocation). The report will generate and display in a table format.
- Apply Filters: Use filters on the left (e.g., select Sites and choose Harborview Medical Center) to refine results.
Pro Tip: Reopen the dashboard pane and hover over the report you wish to favorite and click Add to Favorites (the Star Icon).
Exporting Reports
Exporting Reports — Quick Steps
- Run a Standard Report:
- Click the Space Management icon from the left-hand navigation pane.
- Select the Reports menu.
- Select a report (e.g., Building Summary by Org Code).
- Access Export Options:
- In the report viewer, locate the Export dropdown in the upper-left corner.
- Review the available formats: Excel, PDF, RTF, or CSV.
- Export the Report:
- Click the format you want (e.g., Export Excel).
- Wait for the report execution progress to complete.
- Your browser will notify you when the file is downloaded.
- Verify the Export: Open the exported file and review the data.
Pro Tip: Use Excel for charts and pivot tables. Choose CSV for importing into databases or BI tools.
Creating Custom Reports
Creating Custom Reports — Quick Steps
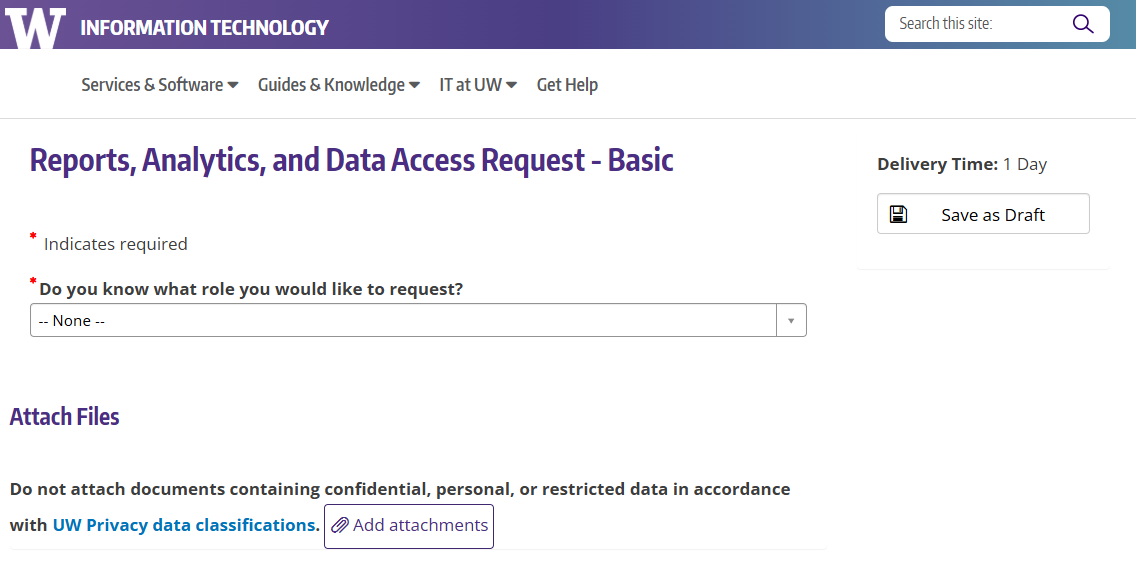
Request Access to EDW
- Visit the Reports, Analytics, and Data Access Request – Basic online form.
- Select “I know the name of the role” in the “Do you know what role you would like to request?” menu.
- Select “Administrative Analyst” from the “Select the requested role:” menu.
- Validate the Requester’s Information section is accurate (this should be the information for the person requesting access to EDW).
-
Provide a short business justification for the access request, such as:
“I am requesting access to EDW to view space data in order to support accurate space management, asset tracking, and utilization reporting.”
- Submit the request.
Wait for Supervisor Approval
- The access request will route to your supervisor for approval.
- After access is approved you will be able to connect to EDW the following day.
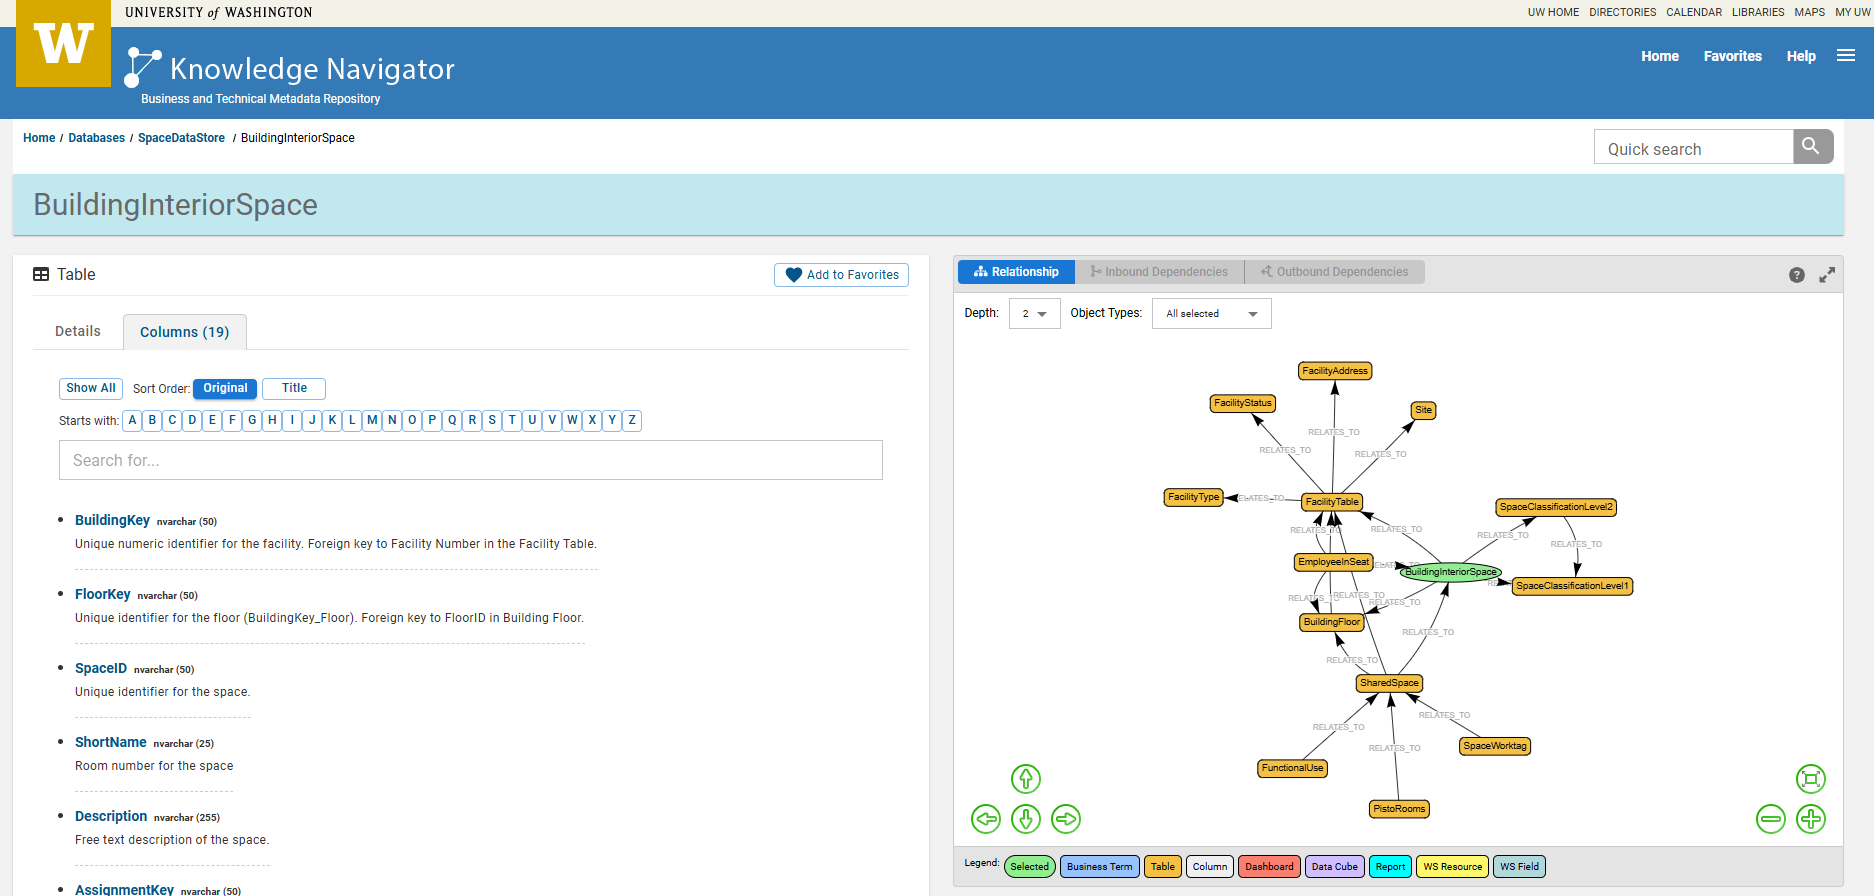
Review Metadata in Knowledge Navigator
- Check out the Space Data Store metadata to learn more about the tables and data elements in the database.
- Metadata and relationships are available for all tables and columns.
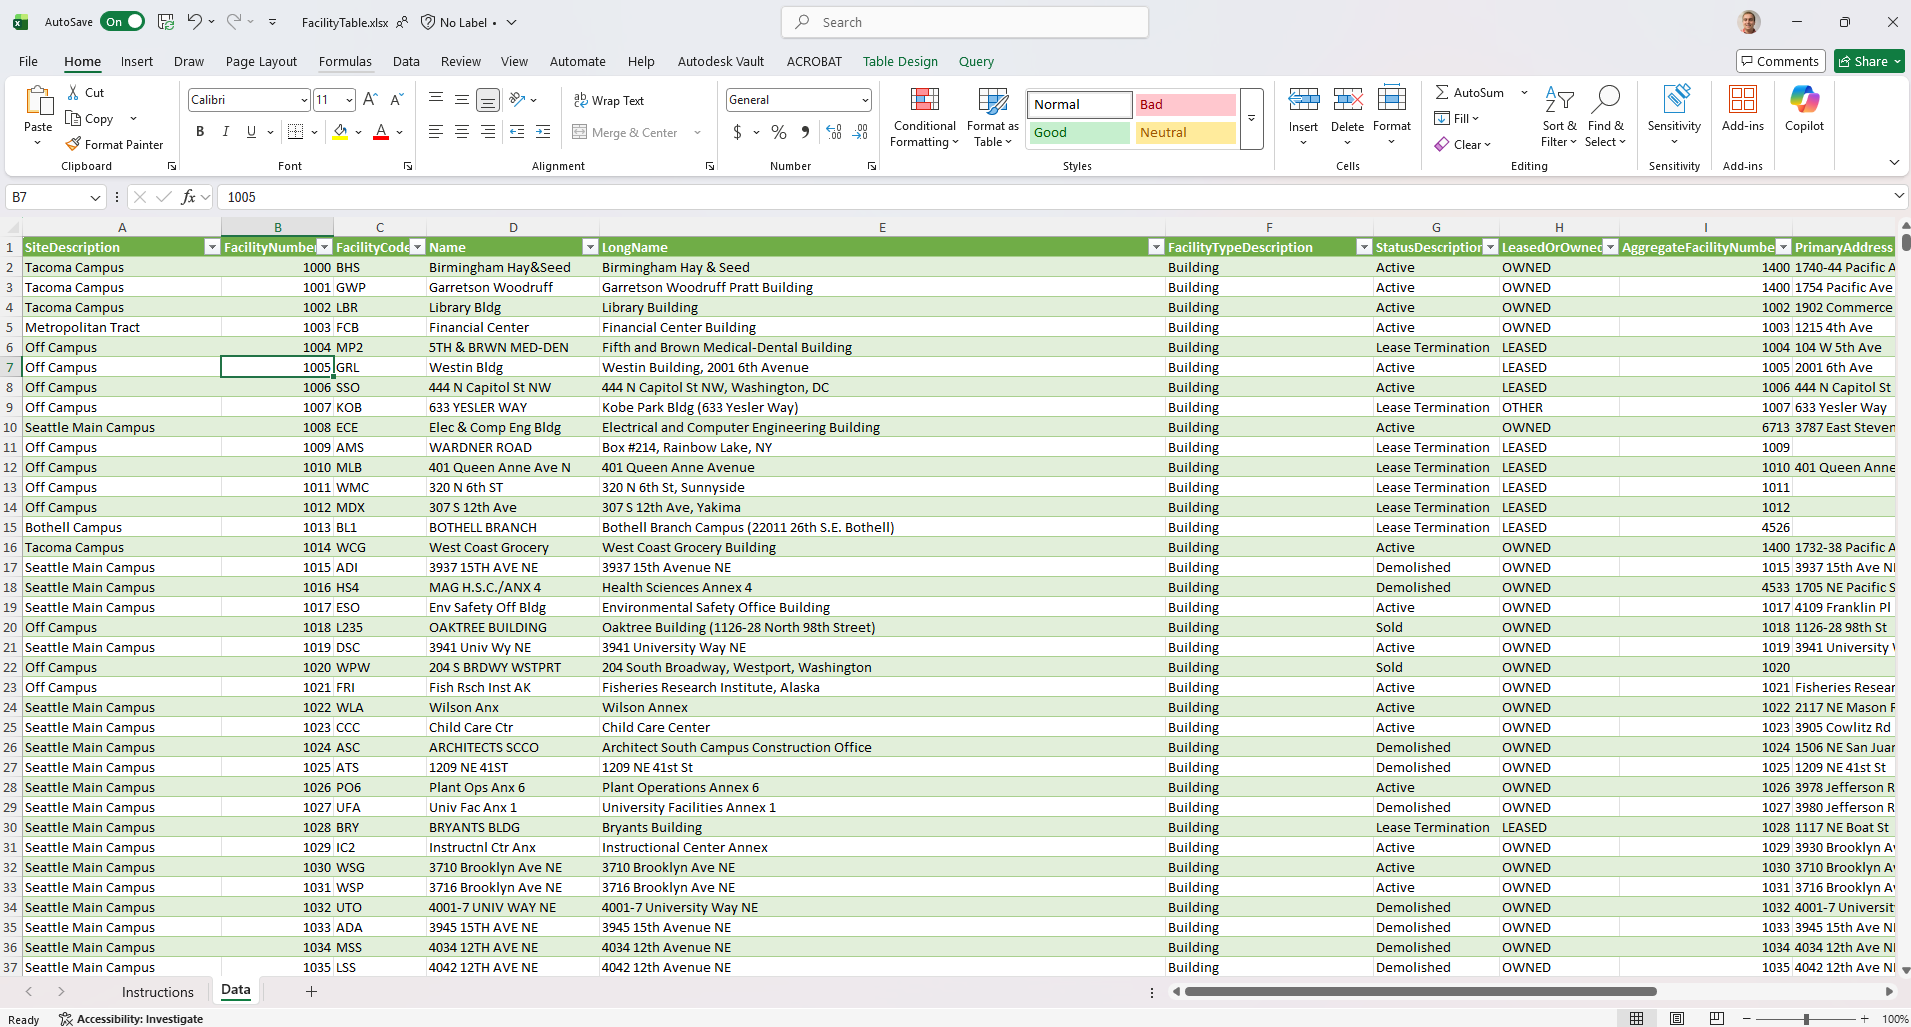
Request linked Excel from UWF: BIT
- Send an email to uwftech@uw.edu requesting access to the linked EDW Excel file.
- Save a copy of the Excel file to your computer.
- Open the Excel file to review the available tabs and data.
- To refresh the data:
- Connect to the Husky OnNet VPN if you are working from an offsite location.
- Open the file in the desktop version of Excel.
- When prompted, click Enable Content in the security banner below the ribbon.
- Go to the Data ribbon and select Refresh All.
- If prompted, click Run in any Native Database Query pop‑up windows.
Module 5 - Editing Space Information
Editing Individual Records
Editing Individual Records — Quick Steps
- Navigate to Space Management > Views > 1.40 Rooms
- Select a room and click Edit
- Expand the Space Information panel
- Update fields like Space Category, Primary Use, and Capacity
- Click Save Changes
Pro Tip: Users with edit permissions can only make changes to their assigned spaces.
Editing Multiple Records
Editing Multiple Records — Quick Steps
- Go to the 1.40 Rooms data view
- Use the checkboxes to select multiple rooms
- Click Edit Multiple
- Expand the panel and update shared fields
- Click Save Changes
Pro Tip: Bulk editing is only supported for room records.
Manage Room Occupants
Manage Room Occupants — Quick Steps
- In a room record, expand the Room Occupants panel.
- Click Assign, search for and select an employee.
- Confirm or adjust primary assignment.
- Click Select to finalize.
- Use Vacate to remove assignments if needed.
Module 6 - Research Space Tracking
Managing Shared Space Assignments
Managing Shared Space Assignments — Quick Steps
Create a New Shared Space Assignment
- Expand a Room Record within the 1.40 Rooms data view and review 1.60 Shared Space*
- Click Add to open the 1.60 Shared Space window
- In the Details tab, enter the Dept Percent (e.g., 50.00)
- Click Select next to Department and search by cost center ID or name (e.g., CCH1012155)
- Choose the correct department and click Select
- Click Submit to save the assignment
Modify an Existing Allocation
- In the 1.60 Shared Space* panel, click Edit next to the record
- Update the Dept Percent or Department fields
- Click Save Changes
Delete a Shared Space Assignment
- Select the record to remove from the 1.60 Shared Space* panel
- Click Delete, then confirm by clicking OK in the popup
*Pro Tip: There are two shared space sections. 1.60 Shared Space includes the allocations you are authorized to manage, while 1.60r Shared Space - Read Only includes every allocation within the room (including those assigned to other departments). To edit, make sure you are selecting records in 1.60 Shared Space.
Managing PIs, Worktags and Functional Use Codes
Managing PIs, Worktags & Functional Use Codes — Quick Steps
Are you working in a room allocated to your organization?
- Yes - Open the 1.40 Rooms data view and proceed to the next section.
- No - Your shared space is located within a room allocated to another organization. In this case, select 1.40 Rooms - Read Only.
Notes:
- The 1.40 Rooms view displays only rooms allocated to your organization, while 1.40 Rooms – Read Only shows all rooms and spaces in the inventory.
- Alternatively, you can manage this data using 1.70 Budget Query. Please refer to the relevant training curriculum for guidance.
Assign a Principal Investigator (PI)
- Expand a Room Record within the applicable rooms data view and review 1.60 Shared Space*
- Click Edit next to a shared space record
- Go to the Allocations tab and click Add under Add Principal Investigator
- Click Select next to Employee ID to search for a PI by name or Employee ID
- Enter the PI Percent (e.g., 25%) and click Submit
Assign a Worktag
- While editing a shared space record, click Add under Add Worktag Code(s)
- Click Select next to Worktag ID to search by Worktag ID or name (e.g., GF138960)
- Select the correct Worktag and optionally mark this as the primary room for this budget
- Click Submit to save
Note: The following Worktags can be assigned to a research allocation in FM:Systems: Cost Center, Gift, Grant, Program and Project
Apply Functional Use Codes
- Click Add under Add Functional Use
- Select an Activity Code from the dropdown (e.g., Joint Use)
- Enter the Room Percentage (e.g., 25%)
- Click Submit to save
Fix Over-Allocations
- If total percentages exceed 100%, click Edit next to the entry
- Adjust the percentage to bring totals within compliance
- Click Save Changes
Delete Records
- Select the record(s) from the list
- Click Delete, then confirm by clicking OK in the popup
*Pro Tip: There are two shared space sections. 1.60 Shared Space includes the allocations you are authorized to manage, while 1.60r Shared Space - Read Only includes every allocation within the room (including those assigned to other departments). To edit, make sure you are selecting records in 1.60 Shared Space.
Using the Budget Query Tool
Using the Budget Query Tool — Quick Steps
- Access the Tool:
- Click the Space Management icon
- Navigate to Views > 1.70r Budget Query - Read Only
- Apply Filters:
- Click Show Filters
- In the Worktag ID field, paste your Worktag (e.g., GR003279)
- Set the filter to EqualTo
- View Matching Records:
- The grid will display rooms linked to the filtered Worktag
- Click a record to view details
- Expand Details: Use the expand/collapse button to view more details
- Manage Data:
- Use the 1.70 Budget Query data view
- Add, edit, or delete research data
- To manage data, follow the steps described in the earlier sections of the module
Pro Tip: 1.70 Budget Query allows you to edit all shared space records assigned to your organization, including shared spaces located within rooms allocated to another department.